INTRODUCTION
The following project was developed as part of the course "Laboratorio didattico di ingegneria
dell'informazione" at the University of Udine.
The aim is to create a stroboscopic tuner for musical instruments, capable of providing an intuitive
and
visual interface to facilitate tuning.
The device detects the frequency of the sound emitted by the instrument and, through a rotating
representation
(e.g. a needle, a display, LEDs), provides an immediate and directional indication of the deviation from the
desired note.
The project combines skills in electronics, programming and signal processing, proposing a concrete and
didactically significant application.
You can find other students projects at lab-ing-inf.uniud.it
SPECIFICATIONS
Features:
- The user selects the note (e.g. "E", "A", etc.) to which he wants to tune the instrument.
- The user plays the note on the instrument.
- The device detects the frequency of the played note and displays a rotating indicator that rotates clockwise if the note is too low or rotates counterclockwise if the note is too high. The rotation speed indicates how much the note deviates from the desired one (with a monotonous trend).
- The device can emit a reference sound at the frequency of the selected note, for an initial tuning "by ear".
Simplifying assumptions:
- The maximum deviation of the played note can be limited to one or two semitones.
- The device can be designed for a specific instrument (e.g. guitar), simplifying the selection of notes.
In the following sections you can see how the various specifications were addressed and the choices made to build the prototype.
CONCEPT
The initial idea behind the project was to create a compact and portable device (figure 1), easy to use on the
go whenever tuning is needed.
To display the rotation required for the stroboscopic tuning effect, LEDs arranged in a circular
pattern
were chosen,
as they are less resource-intensive and simpler to implement than a physically rotating element like a
needle.
A small display shows the tuning settings, and buttons allow the user to interact with the
device.
Additionally, a built-in speaker plays the reference note for rough tuning by ear.
To simplify development and testing, the project was limited to tuning the guitar, an instrument
readily available for experimentation.
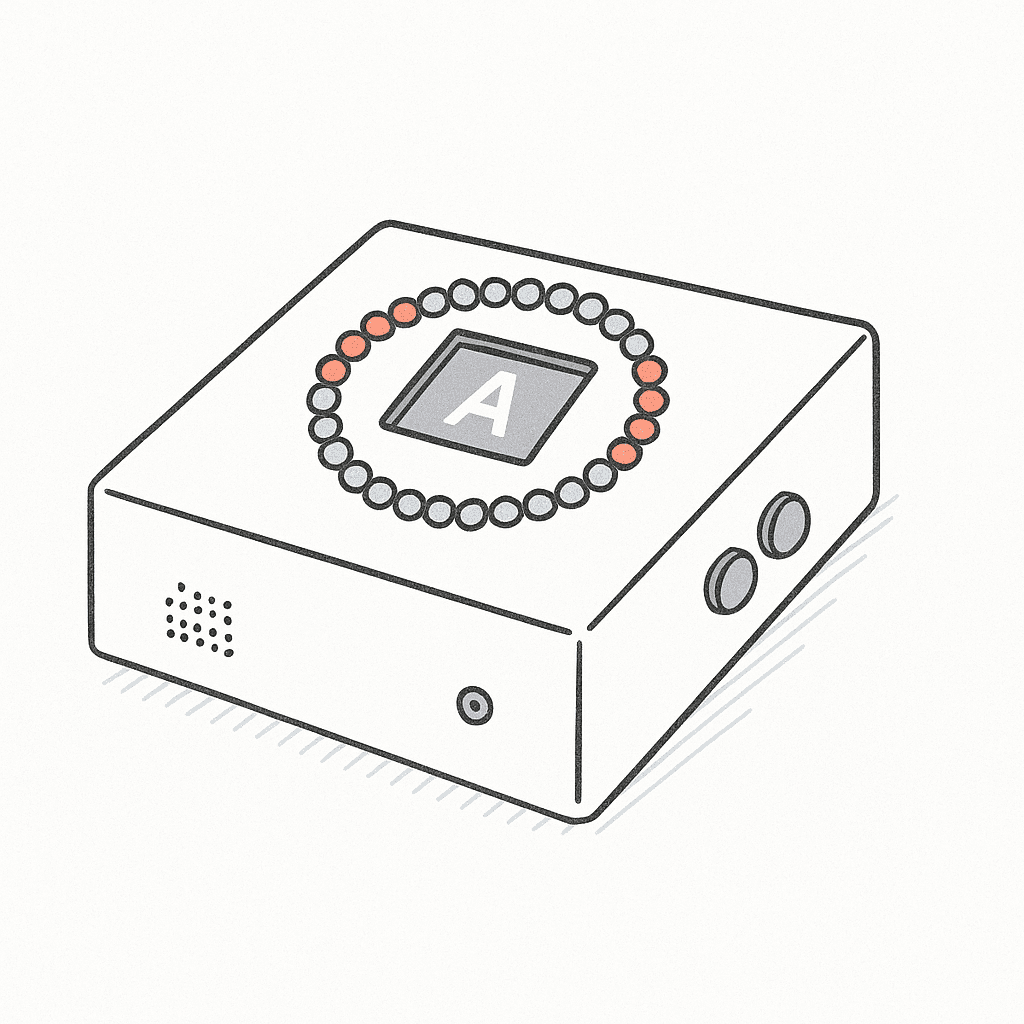
Figure 1: a sketch of the final product.
REALIZATION
The device is based on an Arduino Nano, selected for its small form factor. Audio input is
captured via a microphone, and the signal is sampled for frequency analysis.
To determine the fundamental frequency, I considered both autocorrelation and the Fast Fourier
Transform (FFT).
Due to greater familiarity and suitability for the task, I chose the FFT approach, which
transforms the signal from the time-domain to the frequency-domain, allowing detection of the dominant
spectral
peak, corresponding to the played note.
Given the limited computational resources of the Arduino, I used a 128-point FFT with a sampling
rate of 2000 Hz, providing sufficient resolution to distinguish between the standard guitar strings
frequencies (in table 1). This also allowed for a trick in the code: because both
sampling
and transformation takes the same time, they can be switched to allow continous control of the
interface (understand more in dedicated section).
| String | Frequency [Hz] | Pitch |
|---|---|---|
| 1 (E) | 329.63 | E4 |
| 2 (B) | 246.94 | B3 |
| 3 (G) | 196.00 | G3 |
| 4 (D) | 146.83 | D3 |
| 5 (A) | 110.00 | A2 |
| 6 (E) | 82.41 | E2 |
Table 1: 6 string guitar standard tuning (source).
The detected frequency is then compared to the selected target note frequency and the tuning deviation is calculated in musical cents, a logarithmic unit suitable for measuring pitch differences as perceived by the human ear. I used the standard formula (source) that gives a precise measure of distance between two frequencies:
cents = 1200 * log₂(f₂ / f₁)
Based on this deviation, the rotation speed of the LEDs is adjusted in discrete steps, with the
direction indicating whether the note is sharp or flat relative to the target. This visual feedback
provides
a clear and intuitive indication of how much the string needs to be tuned.
On the dedicated pages you can find the description of components, electrical diagrams and software used for this project.
OPERATION
When powered on, the tuner starts listening for sound input to detect the note being played. When it detects a stable and valid sound, it activates the LEDs and displays tuning information, avoiding false triggers from background noise.
The visual feedback is provided by display and LEDs as follows:
- string is too low: LEDs rotate clockwise and an upward arrow is shown
- string is too high: LEDs rotate counterclockwise and a downward arrow is shown
- string is correctly tuned: green cross on the LED ring and a smiley face appears on the display
The speed of LEDs rotation increases with the tuning error, giving a quick sense of how far off the pitch is.
The tuning always starts from the first string (low E), and the user can cycle through the six guitar strings by pressing the button. You can see the tuner in action in video 1.
Video 1: a test of complete tuning.
If the button is held down, the device plays the corresponding reference tone through the built-in buzzer, helping with a rough manual tuning before fine-tuning. The LEDs lit blue and the display shows a musical note. This is shown in video 2.
Video 2: a test of tones playback.